কি ভাবে ownCloud সেটাপ করবেন Ubuntu 16.04 linux সার্ভার এ ~

ownCloud হচ্ছে একটা ফাইল সার্ভার যেটা গুগল ড্রাইভ , ড্রপবক্স এর মতো একটা ওপেনসোর্স (ফ্রি ) সার্ভার।যেখানে আপনি আপনার মিডিয়া ফাইল ওয়ার্ড ডকুমেন্ট ইত্যাদি রাখতে পারবেন এবং শেয়ার করতে পারবেন অন্য কারো সাথে।এই সার্ভার এর ওয়েব বেস্ড ইউসার ইন্টার ফেস আছে এবং মোবাইল এপপ্স ও আছে।

তাহলে শুরু করা যাক

১> প্রথমে হোস্টনেম এবং টাইম জোনে ঠিক করে নিন
২> অপ্রয়জনীয় নেটওয়ার্ক সার্ভিস গুলি রিমুভ করা নিন এবং সার্ভার এর ৰূট (root) ( SUDO ) পারমিশন নিয়েনিন
৩> তারপর lamp stick ইনস্টল করে নিন

# sudo apt install tasksel
# sudo tasksel install lamp-server
# sudo apt install apache2

~ /etc/apache2/apache2.conf
________________________________________________
KeepAlive On
MaxKeepAliveRequests 50
KeepAliveTimeout 5
________________________________________________

# sudo systemctl restart apache2
# sudo apt install mysql-server
________________________________________________

# mysql -u root -p

~ ALTER USER ‘root’@’localhost’ IDENTIFIED WITH ‘mysql_native_password’ BY ‘password’;

~quit

# sudo apt install php7.0 libapache2-mod-php7.0 php7.0-mysql
# sudo apt install php7.0-curl php7.0-json php7.0-cgi
# sudo systemctl restart apache2

৪> আপনার ubuntu সার্ভার কে আপডেট করতে করতে হবে
# sudo apt update && sudo apt upgrade

Install ownCloud

repository key অ্যাড করতে হবে apt এ , অরে ইনস্টল করতে হবে ownCloud:

# sudo wget -nv https://download.owncloud.org/download/repositories/9.1/Ubuntu_16.04/Release.key -O Release.key
# sudo apt-key add – < Release.key
# sudo sh -c “echo ‘deb http://download.owncloud.org/download/repositories/9.1/Ubuntu_16.04/ /’ >

/etc/apt/sources.list.d/owncloud.list”

# sudo apt update
# sudo apt install owncloud

MySQL কনফিগার করতে হবে

mysql সার্ভার এ লগইন করতেহবে root password দিয়ে।

# mysql -u root -p

নতুন একটা ডাটাবেস বানাতে হবে owncloud এর জন্য এবং নতুন একটা পাসওয়ার্ড দিতেহবে শক্তিশালী।

CREATE DATABASE ownCloud;
CREATE USER ownCloud@localhost;
SET PASSWORD FOR ‘ownCloud’@’localhost’ = PASSWORD(‘strong_password’);

ডেটাবেসে এর জন্য নতুন একটা ইউসার বানাতে হবে।

GRANT ALL PRIVILEGES ON ownCloud.* to ownCloud@localhost;
FLUSH PRIVILEGES;
exit

MySQL সার্ভার এ লগইন করতেহবে নতুন যে ইউসার টি বানিয়েছেন এখন ঐটা দিয়ে

# mysql -u ownCloud -p

আপনি আপনার mysql ইউসার টি চেক করতেপারবেন এই command দিয়ে

#SELECT current_user();
________________________________________________________________
+——————–+
| current_user() |
+——————–+
| ownCloud@localhost |
+——————–+
1 row in set (0.00 sec)
________________________________________________________________

এখন একটা ওয়েব ইউসার ইন্টারফেস এ অ্যাডমিন একাউন্ট বানাতেহবে


owncloud সার্ভার টি সেটআপ করে পর আপনার কম্পিউটার এর ইন্টারনেট ব্রাউজার এ যাবেন এবং টাইপ করবেন ip_address_or_domain/owncloud

তার পর একটি অ্যাডমিন একাউন্ট বানাবেন

তার পর ক্লিক করবেন Storage & database তার পর database login information দেবেন যেমন আপনার Mysql ডাটাবেস ইউসার এবং পাসওয়ার্ড :

স্বাগতম owncloud মিডিয়া সার্ভার এ

এখন আপনি আপনার মতো ফাইল সার্ভার টি সাজিয়া নিন
যদি কোনো প্রব্লেম মনে হয় তা হলে আমাকে জানান কমেন্ট করে|
ধন্যবাদ

Gallery  —  Posted: January 10, 2018 in linux
Tags: , , , , ,

How To Create Inbound Carrier In Vicidial

Follow these steps:

1) Context for incoming calls is “trunkinbound” in your carrier
2) Make sure that you have created DID
3) make sure that you have created INBOUND-Group and select your campaign.
4) Make sure you are getting the digits equal to its DID sent by your carrier.
5) Its basic but don’t forget ( asterisk reload or dialplan reload before the tests )

Account Entry:

[metronet]
disallow=all
allow=alaw
allow=gsm
allow=ulaw
allow=g729
type=peer
nat=yes
username=username
secret=password
host=your_host
dtmfmode=rfc2833
context=trunkinbound
qualify=yes
canreinvite=no
insecure=port,invite

Dialplan Entry

exten => _90[2-9]X.,1,AGI(agi://127.0.0.1:4577/call_log)
exten => _90[2-9]X.,2,Set(CALLERID(num)=your_did_Number)
exten => _90[2-9]X.,3,Dial(SIP/${EXTEN:1}@metronet,,tTorR)
exten => _90[2-9]X.,4,Hangup

Image  —  Posted: January 10, 2018 in vicidial
Tags: , , , , , , ,

HOW TO Create Voicemail Boxes On Vicidial Predictive Dialer

TWO OPTIONS FOR ADDING VOICEMAIL IN THE SYSTEM:

1>———————————————————————————-

VOICEMAIL PHONE EXTENSION 

Voicemail Box -This field is for the voicemail box that the messages go to for the user of this phone. We use this to check for voicemail messages and for the user to be able to use the VOICEMAIL button on astGUIclient app.

Voicemail Zone -This setting allows you to set the zone that this voicemail box will be set to when the time is logged for a message. Default is set in the System Settings.

Voicemail Options -This optional setting allows you to define additional voicemail settings. It is recommended that you leave this blank unless you know what you are doing.

Phones Email -The email address associated with this phone entry. This is used for voicemail settings.

Delete Voicemail After Email -This optional setting allows you to have the voicemail messages deleted from the system after they have been emailed out. Default is N.

Voicemail Greeting -This optional setting allows you to define a voicemail greeting audio file from the audio store. Default is blank.

Voicemail Instructions -This setting allows you to define if the voicemail instructions will play after the voicemail greeting when a call rings on the agent extension and times out to voicemail. Default is Y.

New Messages -Number of new voicemail messages for this phone on the Asterisk server.

Old Messages -Number of old voicemail messages for this phone on the Asterisk server.

Client Protocol -The protocol that the phone uses to connect to the Asterisk server: XAX2,SIP, Alos, Zap , there is EXTERNAL for remote dial numbers or speed dial numbers that you want to list as phones.

VoiceMailBox Number for Vicidial 8500

2>—————————————————————————————

VOICEMAIL TABLE

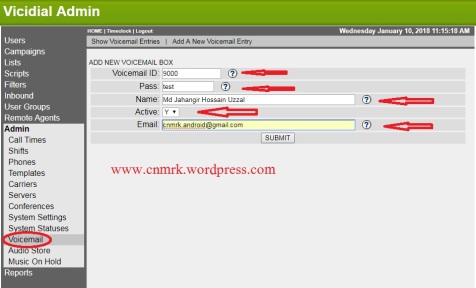
Voicemail ID -This is the all numbers identifier of this mailbox. This must not be a duplicate of an existing voicemail ID or the voicemail ID of a phone on the system, minimum of 2 characters.

Name -This is name associated with this voicemail box. max 100 characters, minimum of 2 characters.

Password -This is the password that is used to gain access to the voicemail box when dialing in to check messages max 10 characters, minimum of 2 characters.

Active -This option allows you to set the voicemail box to active or inactive. If the box is inactive you cannot leave messages on it and you cannot check messages in it.

Email -This optional setting allows you to have the voicemail messages sent to an email account, if your system is set up to send out email. If this field is empty then no emails will be sent out.

Image  —  Posted: January 10, 2018 in linux, vicidial
Tags: , , , , , , , , ,

How To Setup Android OS On Virtual Box.


If You Like My Videos Please Subscribe My Channel ..


Virtual Box Download Link :- http://adf.ly/1kIbde
android iso download Link:- http://adf.ly/1kIc1b

Vmware Download Link:- http://adf.ly/1kIcgX


Thank

Gallery  —  Posted: December 16, 2016 in linux
Tags: , , ,

HI there,

i m going to show u a cool trick how to Shutdown Friend’s computer

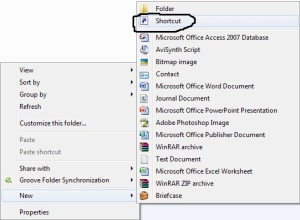
STEP 1)  right-click on any where goto -> New -> Shortcut.

s_1

STEP 2) Type in shortcut:-  %windir%\system32\shutdown.exe -s -t 120 -c “ha ha ha ha ha ha Your Computer going to HELL”

s_2

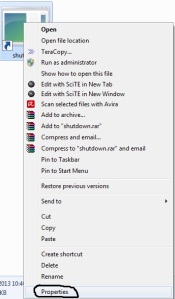
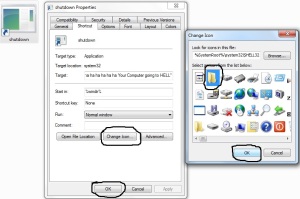
STEP 3) right-click the shortcut goto -> Properties -> Choose Icon. Now choose any icon of your choice.
s_3

DEN

s_4

STEP 4) Compress the file in ZIP and sent it to your friend while chatting and ask him to run it

Gallery  —  Posted: July 1, 2013 in hacking trick